I'm working on getting a small OS kernel (Nautilus) built for my research. It's still pretty early on---I don't have a userspace or any network drivers yet, so for debugging I'm pretty much stuck with printks. This is fine for when I'm running it atop QEMU, KVM, or our in-house VMM, Palacios (which is great for debugging device driver code). However, I need to make use of some pretty specific hardware features on Intel machines, and it turns out most of our dev machines that I can remotely work at are AMD machines. Accordingly, QEMU passes through a lot of the AMD features. So, I took two Intel desktop machines we had laying aound and created a pretty janky setup on my office desk. One is the development machine (call it Aronnax) that will be booting Nautilus (which has no network support). The other machine, (we'll call it Nemo) will be connected to the Nautilus dev machine via serial port, and Nautilus will dump debug information over this serial port. Nemo will run something like minicom so there can be a full-duplex connection over COM1. Nemo is connected to the internet, so I can remotely connect to Nemo, attach to a tmux session, and see debugging output from Nautilus.
Now, if I'm not at my desk, how can I reboot Aronnax when it hangs? The ideal case would be that it had something like a BMC or iDRAC, but it doesn't, and those are expensive, and so are vKVMs, which we also don't have. So, the idea is that I can send a reboot command over the serial port from Nemo to Aronnax, and my Serial IRQ handler in Nautilus will reboot the machine accordingly.
The problem is that my workflow has been something like this: boot Nautilus from USB key -> it crashes -> fix bug -> bring USB key to my programming machine -> flash USB key with new Nautilus image -> plug USB key back into Aronnax -> boot. This will obviously not do if I'm not physically sitting at my desk. I need to get Aronnax to grab a Nautilus image from the network. Enter PXE booting.
IIRC, Preboot eXecution Environment (PXE) was introduced by Intel in the late 90s to allow computers to boot over the network. It's basically a chunk of code that sits in NIC ROM that requests an IP address using DHCP. The DHCP server will dole out an IP address and tell the NIC the location of a TFTP server and an image. The NIC will then go off to the TFTP server and find the image to boot. This works great for Linux kernel images, as PXE supports them natively. However, I could not get PXE to directly boot Nautilus. I'm not sure why, and it may be that I was just doing something wrong. Instead, I decided to go with a more indirect route. I got PXE to chainload gPXE, which is a more flexible, open-source implementation of PXE. I then got gPXE to grab a GRUB2 bootloader image over the network, which then will boot Nautilus. Why GRUB2? To get around having to write some of the early boot cruft, I decided to make Nautilus Multiboot2 compliant. GRUB2 is the only bootloader that I know of that supports Multiboot2. The basic idea is that reading the bootloader structures in a Multiboot2-compliant bootloader is much easier and more powerful than the previous spec revision. So anyway, GRUB2 it is.
Getting this to work was a hell of a pain, which is why I'm outlining the process here, because I'll likely end up doing it again someday. Before going into the process in detail, here's the diagram of my setup:
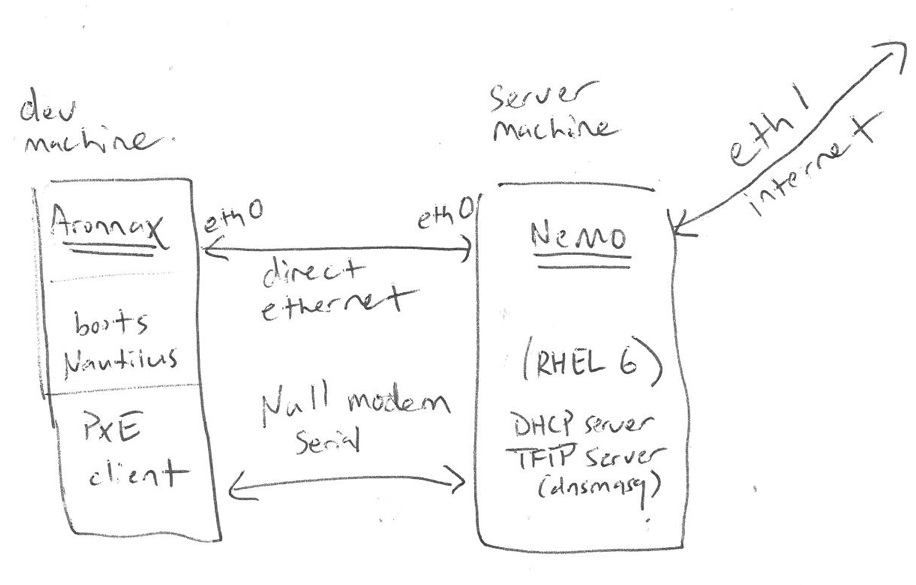
In short, Aronnax is directly connected to Nemo via Ethernet and a Serial Null Modem Cable, and Nemo will serve as a DHCP server and TFTP server for Aronnax (and only for Aronnax). Note that the ethernet connection between Nemo and Aronnax is on a different interface than the one that connects Nemo to the outside world.
OK, so here's how we set this up:
First step: get DHCP and TFTP server up and running on the outward facing machine. You could use the tftp and dhcpd programs, but I chose the easier route, dnsmasq. It's nice because it can serve both of these roles. The main thing you need to do is edit /etc/dnsmasq.conf (may change per distro, I'm using RHEL 6). I more or less followed the instructions here. However, I needed to make some changes on account of the PXE -> gPXE bootstrap.
Here are the options I have enabled. Some of this will become clear later:
interface=eth0
bind-interfaces
dhcp-range=192.168.1.50,192.168.1.150,12h
dhcp-boot=gpxe
dhcp-userclass=gPXE-booted,"gPXE"
dhcp-boot=net:gPXE-booted,boot.gpxe
enable-tftp
tftp-root=/tftpboot/
To start, the first two lines are important because I have two interfaces on Nemo. eth1 is the internet-connected one, and it will be talking to our University DHCP server. I can't have it trying to dole out IP addresses on that interface as well. So we tell it to only use eth0, which will be directly connected to Aronnax. The bind-interfaces directive simply says to really only care about that interface. You can look at the dnsmasq docs for more info.
The dhcp-range command instructs the DHCP server which range of addresses it can hand out. This can be arbitrary as long as you use the same block of IPs that you use for the interface that the server will be listening on. For example, Nemo's eth0 is assigned the ip 192.168.1.1.
Skipping a few options, enable-tftp basically allows dnsmasq to also act as a TFTP server. tftp-root tells it a directory from which it will serve files. You should first create this directory, and give it appropriate permissions and ownership. I used chown -R nobody:nobody and chmod -R 777.
dhcp-boot is probably the most important option here. It tells the DHCP server what file it should hand out when a PXE client comes along and starts asking. Typically it will hand out a binary image named pxelinux.0, which is just the result of building PXELINUX. This is the software side of PXE, and this program will be loaded into memory and executed by the CPU once it's retrieved from the network. You can think of it as a bootloader. The binary will be sitting in the TFTP root directory, which is the directory that your TFTP server knows about. Along with pxelinux.0, there will also be a directory in your tftproot dir named pxelinux.cfg. Inside that directory, you put a configuration file for each machine that you will be PXE booting. A PXE client can get its configuration file by looking in pxelinux.cfg and doing a longest prefix match on it's MAC address. A config file will be named this way:
01-00-11-22-33-44-55
Where that is 01 followed by the MAC address of the machine. Typically what you do so you don't have to type that at the command line is make a symlink to it named something sane. If a client can't find a file for its MAC address, it will look for a file named default. Here are the contents of my config file:
default nautilus

label nautilus
        kernel gpxe

        prompt 1
        timeout 20
So now the DHCP server will hand over the gPXE image, and Aronnax will boot it. gPXE will then go through the whole song and dance again, but here's the kicker. gPXE doesn't work well with multiboot kernels. So we need it to grab GRUB2, which can then grab the Multiboot2 Nautilus kernel and finally boot it. This will require some magic, and that magic is in the dnsmasq configuration. We skipped a few lines before. Here they are again:
dhcp-userclass=gPXE-booted,"gPXE"
dhcp-boot=net:gPXE-booted,boot.gpxe
The point of these two lines, is to differentiate between PXE and gPXE. If we didn't have these lines, after PXE got the gPXE image over the network, gPXE would talk to the DHCP server again, which would give it the gPXE image, and ad infinitum we would do this over and over. This breaks that loop.
gPXE will identify itself to the DHCP server with the string gPXE, and the server can use that to basically say "for this particular type of machine, dole out a different image." In this case, we create a tag for a machine which has booted from gPXE, and for that machine, we send it a gPXE script. These scripts are a nice addition and are one of the things that makes gPXE more powerful than PXELINUX. This script must also reside in your version of /tftpboot with the appropriate permissions. Here are the contents of my boot.gpxe script:
#!gpxe
imgfetch boot/grub/i386-pc/core.0
imgload core.0
boot
This tells gPXE to fetch an image from the TFTP root directory, load that image, and subsequently boot it. Where did that magic directory come from? We're getting there.
EDIT: as of 2010 gPXE is no longer being actively developed. iPXE is a gPXE fork that seems to work pretty well. I've since booted another machine using iPXE. You can pretty much take the above wholesale and just replace all of the images and scripts appropriately.
EDIT: if when you boot up you see something dealing with memory being freed followed by a hang, chances are your NIC's PXE ROM is using a buggy Broadcom NIC driver. These drivers seem to have difficulty with the chainloading process we're using here.
For GRUB2 to play nicely with gPXE, you need to compile it from source with support for this whole process. Namely, you need it to have TFTP and PXE support. You first need to download the GRUB2 source, and build it. Once you've built it, you can use a nifty program called grub-mknetdir to package everything it will need up into a directory that you can stick directly into your TFTP server root. To do this from the directory that you built GRUB2 in, you can run the following command:
./grub-mknetdir -d ./grub-core --net-directory=./test
The -d option tells it where it can get all of the modules it needs. --net-directory is the output directory. Normally I could just copy this over to my TFTP server, but not quite yet. The GRUB image it builds and sticks in there isn't quite what we need. In this case, it will stick it in a binary at ./test/boot/grub/i386-pc/core.0. We need to replace this file with what we need. We can do that with this command:
./grub-mkimage -d grub-core/ -O i386-pc-pxe --output=test/boot/grub/i386-pc/core.0 --prefix='(pxe)/boot/grub' pxe tftp
This builds a custom GRUB2 image that will have PXE and TFTP support. Notice the output format (i386-pc-pxe) and the modules that it will compile in. The prefix directory tells GRUB where it should search for its configuration file. (pxe) is a device shorthand that grub understands, and it will be set to whatever the TFTP root directory is whenever gPXE loads GRUB2.
Now we need to setup a GRUB2 configuraiton. By default, the mknetdir command sticks one in /boot/grub/i386-pc/grub.cfg. We need to change that. Mine looks like this:
set timeout=1
set default=0

menuentry "Nautilus" {
        insmod tftp
        insmod pxe
        set root=(pxe)
        multiboot2 /nautilus.bin
        boot
}
This tells GRUB2 it will need to load the tftp and pxe modules first, then set its root directory to the TFTP root. After that, I tell it to load my kernel named nautilus.bin, which is multiboot2 compliant, then boot it. OK, one last thing. Remember when we told GRUB2 that its search prefix is (pxe)/boot/grub? We need to have a GRUB config sitting in that directory. I suppose we could have pointed it directly to /boot/grub/i386-pc, but we'll run with it. Just put another file named grub.cfg in /boot/grub/grub.cfg with these contents:
source boot/grub/i386-pc/grub.cfg
Once we do that, we can copy the boot subdirectory within test over to our TFTP server root directory. At this point, I had to make sure that Aronnax is configured to boot using PXE, reboot it, and off we go. This, of course, took many tries, and much debugging, but it did work.
Now how can I reboot this machine remotely? I simply log in to Aronnax, interact with Nemo over minicom, and send a reboot command. Nautilus has an IRQ handler for the serial port that will respond to this command by rebooting the machine.
Make sure and use a serial null modem cable between the two machines. This is the equivalent of a crossover cable. I had some trouble getting this to work, and found out that I was using a straight-through cable (I also had a very stupid cabling hiccup). To check what kind of cable I had, I had to look up the part number online.
Make sure you set minicom up to use /dev/ttyS0 (or whatever character device corresponding to the serial port you connected the cable to) instead of /dev/modem. You should tell minicom not to treat it as a modem. Make sure you set it up with the same baud rate and flow control settings as you have in your serial driver in your dev OS.